In a Virtual Private Network, the Point-to-Point Tunneling Protocol (PPTP) is used to make sure that the messages transmitted from one VPN node to another VPN node over the internet (which the entire populous has access to) are secure and invulnerable to being accessed by anyone who isn’t authorized to access them. The ability to set up and use Virtual Private Networks and VPN connections comes built into all active iterations of the Windows Operating System out there – and that includes the latest and greatest version of Windows, Windows 10. If you want to set up a VPN connection on a Windows 10 computer, you need to first acquire the credentials you will need to access the VPN server you want to connect to. The required credentials include the name or the IP address of the VPN server you want to connect to and the username and password that you have registered on the VPN server. Once you have this information, to set up a VPN connection on a Windows 10 computer, you need to: Click on the Network connection icon in the computer’s System tray. If the computer is connected to a WiFi network, the icon will look like a WiFi signal. If the computer has an Ethernet connection, the icon will look like a computer with an Ethernet cable on its left side. In the menu that pops up, click on the blue Network settings link at the bottom.
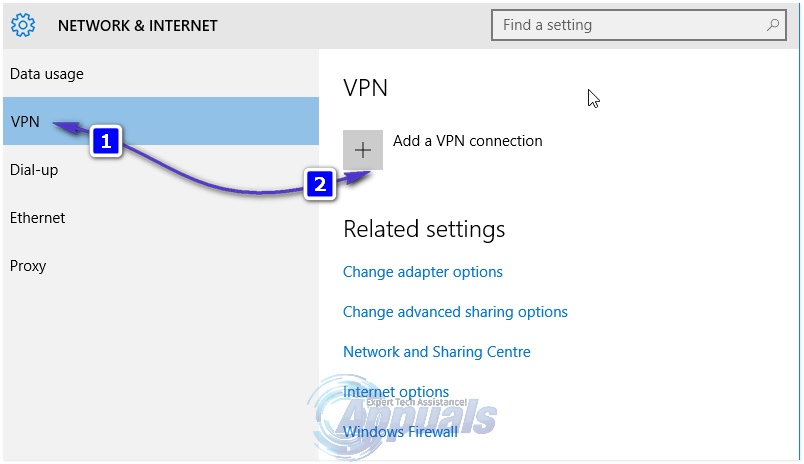
This will open the Network & Internet settings Navigate to the VPN tab in the left pane of this window. In the right pane, click on Add a VPN connection.
Populate the Add a VPN connection window as follows:
VPN Provider: Windows (built-in) Connection name:
How to Set Up a VPN on a DD-WRT RouterFix: VPN connection failed due to unsuccessful domain name resolutionRainbow Six Siege Smoke Elite Set Leaked, Might Be The Coolest Elite Set YetHow to Fix Windows VPN Connecting Only after a Restart