The installation of Ansible is done entirely via the CLI interface, and the demonstration here used a stock bare metal install of Ubuntu Server 16.04 that lacks any sophisticated user interface. If you installed Unity, GNOME or anything else like Xfce4 or LXDE, then simply open a terminal from the application menu before proceeding.
Method 1: Installing apt-add-repository
If your installation of Ubuntu Server 16.04 already allows you to use the apt-add-repository feature, then skip to Method 2. Otherwise, issue the following commands followed by enter each time:
Method 2: Adding the Ansible Repository
Now that you’re able to use apt-add-repository, use sudo apt-add-repository ppa:ansible/ansible to add the needed repository and use sudo apt-get update to index it. Once its indexed, use sudo apt-get install ansible to install the package. The virtual console or terminal may throw a great deal of text at you, but you can simply wait until your prompt is returned to you. sudo apt-get install software-properties-common
Method 3: Configuring SSH Functionality
Issue the command ssh-keygen -t rsa -b 4096 -C “friend@emailbox.addy” while replacing friend@emailbox.addy with the email address you want to associate with the key. Don’t use a password if it asks you to make one, but instead simply push the enter key twice. Ansible can’t connect to added servers if you add a password. After you’re done with this, add the new key by using ssh-agent bash and then ssh-add ~/.ssh/id_rsa before you copy the ssh key to all the servers you’re going to manage. Copy the key to your server with this command ssh-copy-id user@xxx.xxx.x.xxx, replacing the Xs with the actual digits of the IP address of the server in question. You’ll probably be prompted for the remote user’s password. Once everything gets keyed in, you can test that the connection is good by typing ssh friend@xxx.xxx.x.xxx, replacing friend with the name from the email before the domain and the Xs with the IP address once more. You shouldn’t have to enter a password. If everything is working, then simply type exit and move on.
Method 4: Configuring Ansible Itself
Ansible uses its own host file, so you’ll need to use to edit it. You can replace vi with another CLI text editor if you’ve installed if you’d like, such as nano. At the very bottom of the file, add a line with [web-servers] on it followed by the IP address again on the line underneath it. Keep adding lines if you need to add more IP addresses. Save and close the file.
When you’re back at the prompt, issue the command ansible all -m ping and take a look at the result. It should read success.
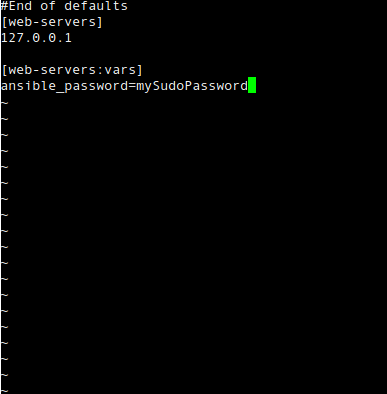
If you see any hint of failure, then the hosts file is probably at fault. You may need to edit again and add the ansible_password option in. Head to the bottom of the file again and create another line, putting only [web-servers:vars] on it, with a line underneath it that has ansible_password=X on it.
Fill in the X with your sudo password and run the test again. It should now be successful.
Ubuntu 18.04 LTS Bionic Beaver Officially Available for Ubuntu, Kubuntu,…SOLVED: “Unable to initialize audit layer: Permission denied” bug in libvirt-bin…How to Configure a Permanent Dual Monitor Setup in UbuntuHow to Configure Windows Server to Query An external NTP Server