One Microsoft Answers user reported that, when using Windows 10 on their HP Pavilion 500, explained: Since installing this update to my desktop, waking up from sleep mode has taken anywhere from 20 seconds to a full minute, with only the cursor visible while it boots. I’ve reverted to the previous update (00970), and it boots up normally in about one second. The problem can be reversed by repairing drivers affected by the Windows update. The following guide will explain how to use the manufacturer driver to fix the issue.
Method 1: Uninstall the Update and Block It from Reinstalling
The first and most effective method of stopping this problem is uninstalling the update and then blocking it from being reinstalled automatically. To uninstall a specific update, you will need to find View Installed Updates by opening Programs and Features in the Control Panel. In here you will find the KB number of the latest update, which should be KB3201845. Now you have the update KB number, you can uninstall it directly from CMD prompt using the following code (which will also not prompt you for a reboot afterwards). @echo off wusa /uninstall /kb:3201845 /quiet /norestart If you want the script to automatically reboot your PC after the uninstall, amend it to: @echo off wusa /uninstall /kb:3201845 /quiet /forcestart Once your PC is rebooted, you will need to stop the Windows Update from automatically installing. You can do this by opening Control Panel, clicking Security, clicking Windows Update, and then in this menu looking for View Available Updates. This should appear in the top left corner. Click it and search for the KB3201845 update, where you will be able to click Hide Update.
Method 2: Run Drivers in Compatibility Mode
The issue can be caused as a result of manufacturer drivers not being compatible with the December update for Windows 10. This can be resolved by re-downloading all manufacturer drivers for your machine, from their official website. Once downloaded from the appropriate site, find the driver setup file, and right click and choose Properties in the menu that appears. In this window, click on the Compatibility tab, which will help you run the application in compatibility mode. You’ll see ‘Run this program in compatibility mode for’ check this box, and then choose Windows 8 from the operating systems that appear in the drop down menu. Once it’s set to run in Windows 8 compatibility mode, continue the installation. When complete restart your computer and the problem should no longer occur.
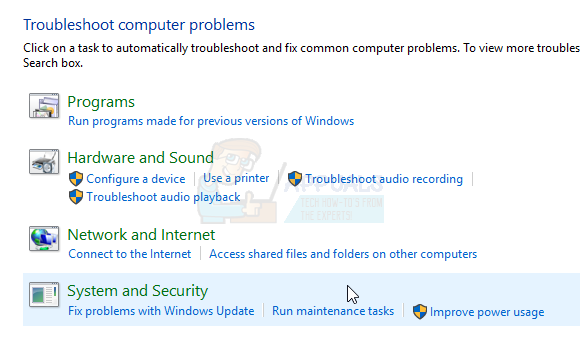
Method 3: Run Maintenance Task
Running automated maintenance on your PC can help clear up programs and settings using a large amount of memory, and fix driver issues. To run maintenance task, press Windows + X on your keyboard and then click Control Panel. In this window, click Troubleshooting, and then press Run maintenance task which appears underneath System and Security. Restart your machine after the automated maintenance has completed.
FIX: Windows 10 WiFi issues After Sleep/Wake or HibernateHow to Fix Mac Black Screen on Wake After SleepHow to: Disable Password After Sleep/WakeHow to Default Surface Pro 4 to Second Monitor or Screen After Boot or Wake up