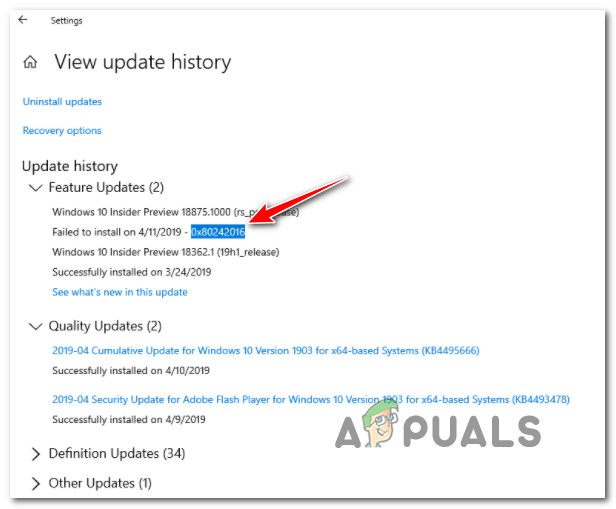
After checking this particular issue thoroughly, it turns out that there are several different underlying issues that might be causing this behavior on Windows 10 and Windows 11. Let’s go through some of the most common scenarios that might trigger the 0x80242016 error code: Now that you have familiarized yourself with every potential scenario that might cause this issue, follow the verified methods below as different troubleshooting guides capable of fixing this issue.
Run the Windows Update Troubleshooter
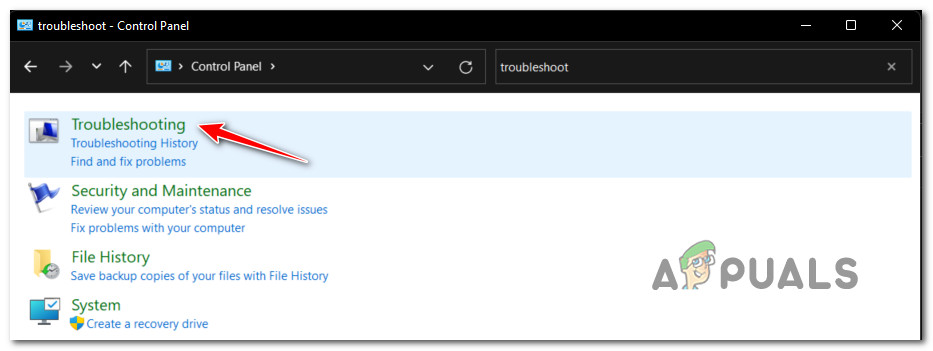
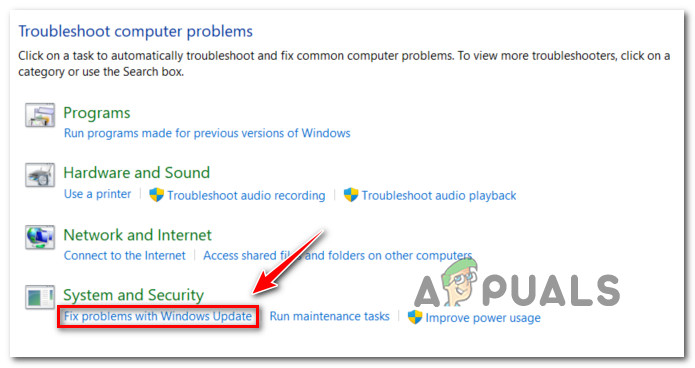
Before you start following any of the methods below, the ideal place to start is by checking if your operating system is not capable of fixing the issue automatically. The automated troubleshooter for WU (Windows Update Troubleshooter) has gotten a lot better in recent years, to the point where the vast majority of issues related to an inconsistent update (interruption, AV interference, etc.) can be handled automatically without the need for user intervention. So, before doing anything else, our advice is to start by running the Windows Update Troubleshooter and applying the recommended fix (if any). If you’re looking for instructions on running the Windows Update Troubleshooter on your Windows PC, follow the instructions below: Note: These steps will work on every recent Windows version, but Windows Update Troubleshooter is most competent on Windows 10 and Windows 11. If the same 0x8024201 error is still occurring, move down to the next potential fix below.
Start every WU Service dependency
Contrary to what most people believe, Windows Update has a lot of services that it’s dependent on. These services need to be configured in a way that allows being called whenever the WU component needs them. If you’re using some kind of performance-optimizing tools, some of these service dependencies might have been adjusted to remain disabled in order to improve the performance of your system. To ensure that Windows Update has everything it needs to complete the installation of available feature updates, you need to ensure that the following services are set to AUTO:
BITS (Background Intelligent Transfer Service)CryptSvc ( Cryptographic Services)TrustedInstaller
By using an elevated Command Prompt to ensure that the startup type of each of these services is set to Auto, you’re essentially ensuring that every WU service dependency is accessible. Follow the instructions below to change the behavior of these services to AUTO in order to fix the 0x80242016: Note: The method below will work on every recent Windows version including Windows 11. In case your attempt at installing the problematic feature update ends with the same 0x80242016 error, move down to the next potential fix below.
Reset every Windows Component
If you ensured (using the method above) that every service dependency is enabled and correctly configured, the next potential culprit that you should investigate is a potential corruption issue affecting the temp files generated by Windows Update. These temporary files (update files, logs, etc.) are stored in two folders: SoftwareDistribution and Catroot2. However, you can’t really delete the contents of these folders since they’re protected under Windows. So the way to get around this issue is to add the .old extension to the name of both – this will force your operating system to disregard them and generate a new folder from scratch (one that doesn’t contain corrupted files). Doing this will force your Windows OS to re-download the failing update files and hopefully eliminate the 0x80242016. However, before you can add the ‘.old’ extension to both of these folders, you’ll need to stop the services that make use of it:
wuauservcryptSvcbitsmsiserver
You can do this manually, or (even better) do it all at once from an elevated Command Prompt. Follow the instructions below to reset every WU component and clear the temp files associated with it from an elevated CMD prompt to fix the 0x80242016: In case you’re still dealing with the same kind of issue, move down to the next potential fix below.
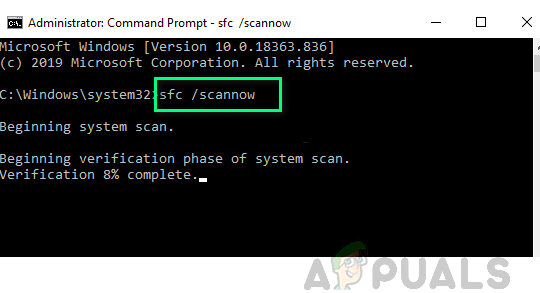
Run DISM and SFC scans
If you followed the methods above already, you’ve made sure that the issue is not occurring due to a WU dependency. However, it’s also possible to see the 0x80242016 error due to some kind of system file corruption that is affecting the auto-updating function of your Windows Installation. In situations like this one, the best course of action is to run utilities like SFC (System File Checker) and Deployment Image Servicing and Management (DISM) in quick succession in order to maximize your chance of eliminating every corrupted element. Important: SFC and DISM share a lot of similarities under the hood, but they do things differently enough to justify running both of them in quick succession. Start with a simple SFC scan and wait until the operation is complete. Note: Opposed to DISM, SFC is a 100% local tool – it works by using a locally cached folder to replace any corrupted system file during the initial scan. Once the SFC operation is complete, reboot your computer and wait for the next startup to complete. After your Windows PC boots back up, go ahead and deploy a DISM scan. Note: Before you start this type of scan, ensure that you have stable access to the Internet. This is necessary because DISM relies on a subcomponent of Windows Update to download the healthy equivalents for the corrupted system files that need to be replaced. After the DISM scan is complete, reboot your PC one final time and check if the 0x80242016 error is fixed by attempting to install the failing update once again.
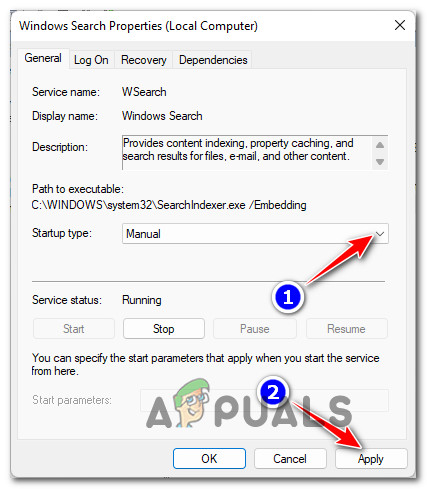
Disable Windows Search Properties (if applicable)
If you’re using an Insider Preview build, you are prone to facing issues that will not make it to a public release. This is the case with the latest outbreak of the 0x80242016 error caused by the improvements brought about to the Windows Search feature. This sort of issue is exclusive to Microsoft Insider’s users and it’s brought about by the main Windows Search service crashing and forcing the installer to roll back the recent upgrade. Fortunately, a few tech-savvy Windows users have discovered a solution. All you need to do is take a trip to the Services menu and changing the Startup type behavior of Windows Search to Manual. If you’re looking for step by step instructions on how to fix this particular scenario, follow the instructions below: If the same kind of issue is still occurring, move down to the final potential fix below.
Perform a Repair Install / Clean install
If you’ve followed every potential fix above and you’re still dealing with the same error code, there’s a big chance you’re dealing with a serious system file corruption issue that you won’t be able to fix conventionally. In situations like this one that you’re facing, the best course of action would be to refresh every system file component that might be preventing Windows Update from installing the pending feature updates. When it comes to achieving this goal, you have two available options: Clean install:
Clean install Windows 10Clean install Windows 11
Repair install (in-place repair)
Repair install Windows 10Repair install Windows 11
Note: If possible, our recommendation is to go for a repair install procedure since it will allow you to fix the issue without any sort of data loss – you get to keep personal files, apps, documents, and even some user preferences that are stored on the OS partition.
How to Fix Wireless Display Install Failed Error Windows 11?How to Fix “Error Code: 0x800F0922” Failed to install Updates on WindowsFix: Windows 7 SP1 failed to install error 0x800f0826[FIX] Windows Failed to Install the following Update with Error 0x800F0986