In Windows 10, the process to automatically log in is easy and there are two methods to do this. If you are using Windows 10 at your home or in a small office setup where your computer is not a part of your Domain, then Method 1 should work for you else if it is part of a Domain network, then Method 2 will do. Before beginning with the guide, there are few things to note. You must have access to an administrator account to makes changes and you must login as the administrator and if you ever decide to change password for the account set to login automatically, then you will need to re-do the steps.
Method 1: Allow Automatic Login via User Accounts
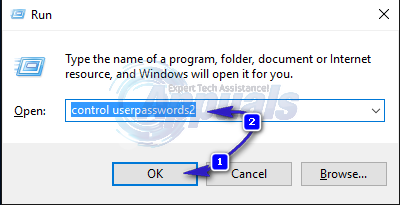
Log in to the administrator account. Hold the Windows key and Press R. In the run dialog, type control userpasswords2 and Press Enter. Click Yes if a User Account Control warning message appears.
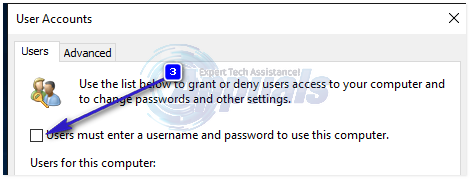
User Account window will now open. In it, uncheck the checkbox next to Users must enter a user name and password to use this computer. Once done, click OK.
If the Users must enter a user name and password to use this computer option is not available, then your computer is part of a Domain network. If this is the case, proceed to Method 2. Now under Users for this computer, select and highlight the local or the Microsoft account that you want to automatically log in with and click Apply. Enter and renter to confirm the password of the account you selected. If your password is blank, then leave both the password input boxes blank and Click OK. The specified account will now automatically log in when your turn your computer on.
Method 2: For Computers Connected to a Domain
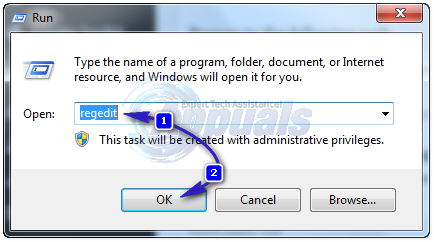
If you are on a domain network, then the method above will not apply to you. This is because user names and passwords are assigned by the Active Directory therefore in order to login without entering a password in a domain environment you will need to modify registry. To do this, follow the steps below: Hold Windows key and Press R. Type regedit in the run dialog and Click OK. Registry Editor Window will open.
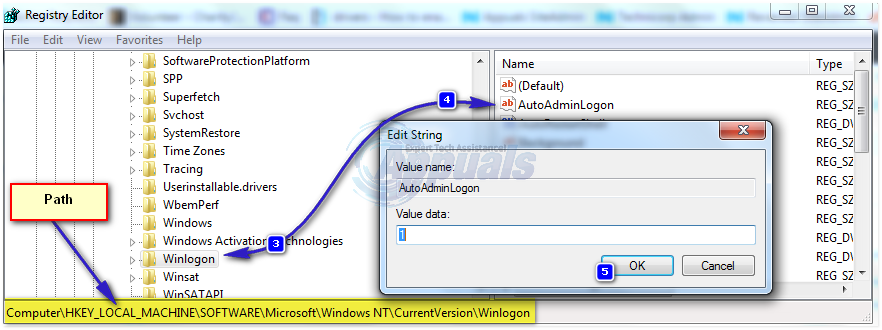
Browse to the following path With Winlogon highlighted in the left pane, locate AutoAdminLogon key in the right pane. Right click onAutoAdminLogon and click Modify and change the value to 1.
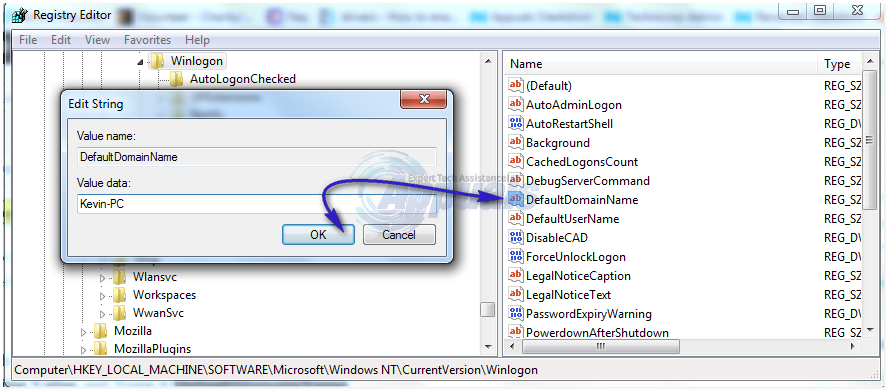
Now reboot PC and follow the User Account Password Wizard method above. If this still won’t work, then go back to Registry Editor and navigate to With Winlogon selected in the left pane, Right click on an empty space in the right pane and look for value called DefaultDomainName if it does not exists, then click New > String Value and Name itDefaultDomainName.
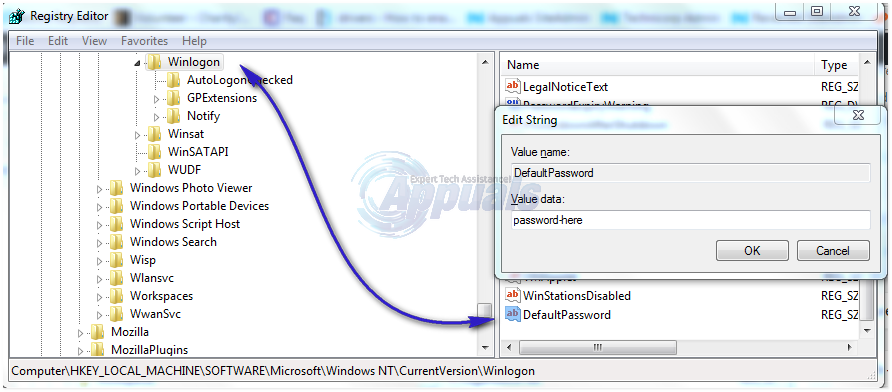
Right click on DefaultDomainName and click Modify. Under Value data type in your domain’s name and Click OK. Similarly create a DefaultUserName string value with your username as Value data andDefaultPassword string value with your current password as Value data.
Now re-check if the Value data of AutoAdminLogon is 1. If not so, change it to 1. Now restart your system and you should be able to log in automatically. If you don’t know what your username and domain name is run the following commands by creating a batch file to see.
How to Login To Windows 7 AutomaticallyHow to: Hide Login Information From Windows 10 Login ScreenFix: Failed to Login Bad Login TekkitHow to Fix Ubisoft Login Error When Trying to Login