This issue may be caused by either a simple glitch or, in most cases, a system upgrade that causes the computer in question to start turning its WiFi adapter off, and thus requiring it to be woken up following every shutdown or restart, in order to save power. The issue may also be caused by LAN being plugged in, so if you have it plugged in, remove it and reboot to test, if it works and you’re okay, leave this as it is but if it doesn’t work and you want both LAN and WiFi to work, then follow the last method to create a group policy. If you are on a domain network, then the domain policy will override this. Thankfully enough, there are some things that you can do to get rid of this problem. The following are the two most effective solutions that can be used to fix a Windows 10 computer that fails to connect to WiFi networks it remembers automatically.
Forget your WiFi network and then reconnect to it
If a simple glitch or bug is causing your computer to not connect to a saved WiFi network automatically, the following is bound to work for you: Click on the WiFi icon in the taskbar. Click on Network Settings Under the Wireless Network Connection section, choose Manage Wi-Fi Settings. Then from under Manage Known Networks, Click the name of your wireless network and choose Forget.
Restart your computer. Click on the WiFi icon in the taskbar and click on your WiFi network from the list of available networks. Make sure that you check the Connect automatically. Click on Connect. Enter the security code for the network. Once your computer connects to the network, its memory should be refreshed and it should connect to the network automatically even after shutdowns and restarts.
Stop your computer from turning its WiFi adapter off to save power
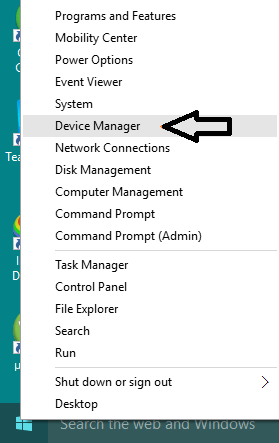
If your computer has not been connecting automatically to WiFi networks it remembers after a system upgrade to Windows 10 or any of its builds, you would be better off trying the following: Right click on the Start button and, in the menu that appears, click on Device manager.
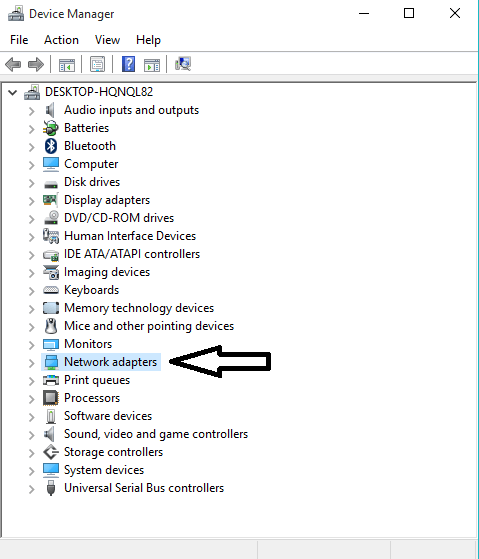
Double click on the Network adapters section to expand it.
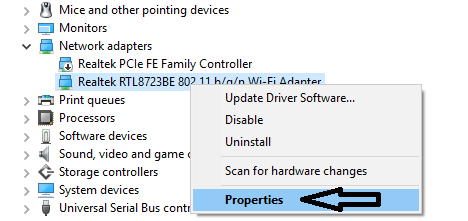
Figure out which of the adapters in the list that appears is your computer’s WiFi adapter and then right click on it. From the right click menu, click on Properties.
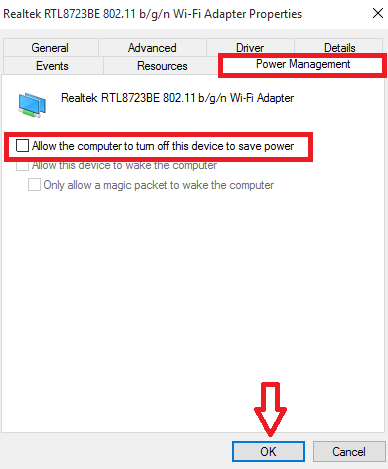
In the dialog that appears, click on the Power management tab to navigate to it. Uncheck the Allow this computer to turn off this device to save power. Click on OK.
Once the change is saved, your computer should start connecting automatically to WiFi networks that it remembers as soon as it wakes up from a shutdown, a restart or a simple sleep. In addition this guide, on 12/22/2015 we troubleshooted the same issue and have found the steps here to work.
Edit or Create Group Policy via Registry Editor
Hold the Windows Key and Press R. In the run dialog, type regedit and click OK. Navigate to the following path in Registry Editor, See if the GroupPolicy subkey exists, if not with WcmSvc highlighted, right click on WcmSvc and Choose New -> Key and name it GroupPolicy, then click GroupPolicy and then in the right pane, (right-click) and choose New -> DWORD (32-bit) and create value, name it as fMinimizeConnections and Click OK. Now, reboot and test. This policy allows you to connect automatically to wireless network, even with a LAN plugged in and works on both Windows 8/8.1 and 10.
Running the Network Troubleshooter (Post 1709 Update)
You should try running the network troubleshooter before proceeding with any other methods. The Windows Troubleshooter analyzes your Wi-Fi hardware as well as checks the connectivity to the internet by accessing Microsoft’s servers. If there is some discrepancy present, it will inform you and attempt to fix it automatically. In most cases, this worked where users were not able to connect to the internet when they started up their computer.
Right-click on your Wi-Fi icon and select “Troubleshoot problems”.
Now Windows will try troubleshooting. Be patient and let the process complete.
Disabling Microsoft Wi-Fi Direct Virtual Adapter (Post 1709 Update)
This function is designed and installed on your system to support sharing of your internet connection (a portable hotspot hosted on your PC). After the update, this feature became available automatically even on devices where it isn’t supported. We can try disabling this function and check if the problem gets fixed.
This workaround should work in most cases particularly with older devices where this device is enabled but it isn’t supported. Do note that disabling this device may not let you use the mobile hotspot feature present in Windows 10 by default. If this doesn’t fix the problem for you, you can always enable the device back using the same steps.
Enabling Computer to put Wi-Fi to Sleep (Post 1709 Update)
Another workaround which worked for many users was to enable the option which allowed the computer to put the Wi-Fi device to sleep to save power. Although this won’t work on most devices, it is still worth a shot.
Running a Check Disk Scan
There are still many bugs/glitches in Windows 10 even after the update. Therefore, in this step, we will be running a Check disk scan to check and repair these bugs/glitches. In order to do that:
Nintendo 3DS or 2DS will not Connect to Wifi Error ‘003-1099’How to Connect to 5GHz Wifi on Windows 7/8 and 10Fix: iPhone won’t Connect to WifiFixed: PS5 Wont Connect To WiFi 2022