The error was initially only reported on a few preview Windows 10 builds. But lately, it’s also been reported on systems that we’re running with the latest Windows updates (including the Creators Update). Although it’s not a given fact, most users have reported that the issue has appeared after the installation of the KB3081448 update on Windows 10.
What is IME?
IME stands for Input Method Editor. IMEs are an important Windows component, as they are used to accommodate keyboard entries for a lot of different languages. If you’re currently struggling with the same issue, you can troubleshoot the problem away with the methods below. All the potential fixes featured in this article were previously confirmed to be effective by at least one user. Please follow each potential solution in order until you encounter a method that resolves’s your issue.
Method 1: Enabling the IME icon from the taskbar
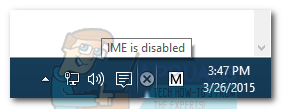
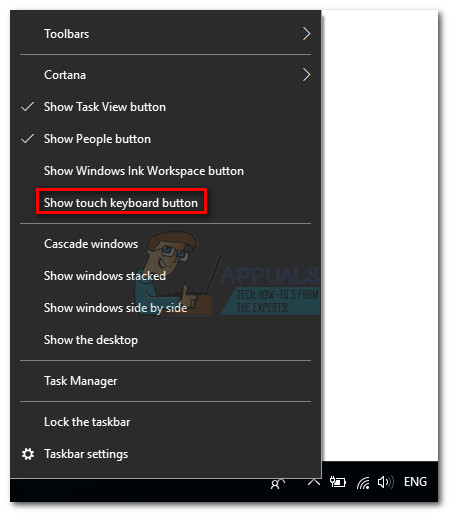
A lot of users have reported that the input method editor was automatically disabled after installing a Windows 10 update. This is causing the IME icon to disappear from the toolbar. Note: If you are able to see the IME icon in your taskbar, skip this method and continue with methods below. You can test this theory by using the left Alt + Shift shortcut. If you are able to change the input language with this shortcut, IME is not actually disabled – you just need to re-enable the IME icon in your toolbar.
In the event that the IME icon is missing from the right-section of you’ll toolbar, right-click on any open space on your toolbar and choose Show touch keyboard button. This should enable the touch keyboard, but your IME icon should back along with it. If you’re able to change languages normal, you’ve just resolved your issue. Else, continue with the next method below. Note: Once you get your IME icon back, you can click on Show touch keyboard again to remove the touch keyboard if you don’t ever use it.
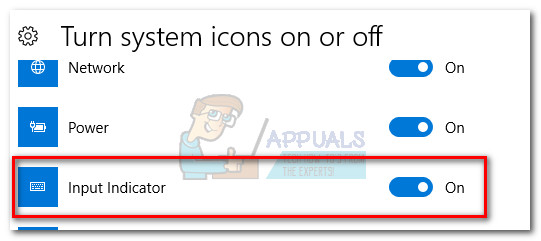
Method 2: Enable Input Indicator from Notification Area
If Method 1 has failed, let’s check if the Input Indicator is turned on in the Notification Area or not. If it’s disabled, you’ll be unable to switch between IMEs or keyboard layouts in case you’re working with more than one language. Follow the steps down below to enable input indicator (if disabled):
Method 3: Changing Input Methods from Advanced Settings
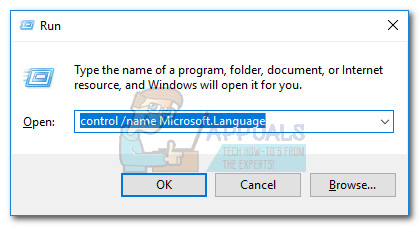
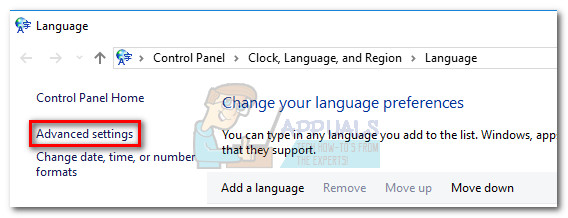
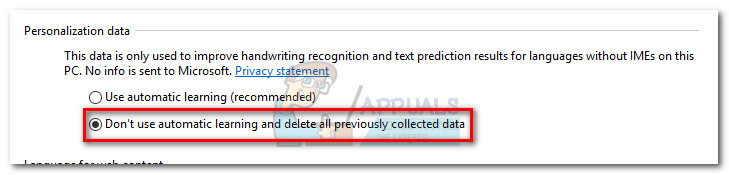
Another method that seems to work for a lot of users when dealing with a disabled IME is changing some advanced languages settings. As it turns out, there are two language settings that seem to conflict with various IMEs. We can remedy this issue by allowing your system to use different input methods for each app window and disabling automatic learning. Follow the steps below to tweak some advanced languages settings and see if you manage to re-enable IME: If you’re still plagued by the same issue, move down to Method 4.
Method 4: Re-downloading the additional language pack
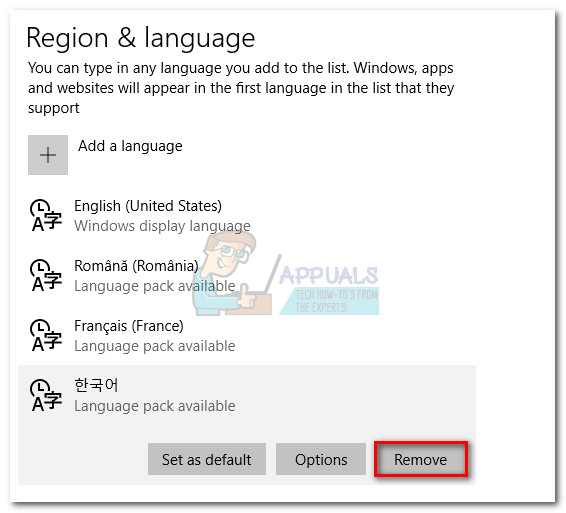
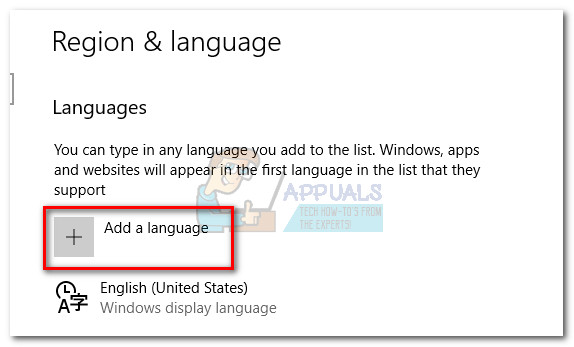
If you’ve followed all of the above methods without success, let’s try re-downloading the additional language pack that you’re trying to use (besides English). Some users have reported that they managed to resolve this particular IME issue by accessing the Region & Language settings and re-downloading the language pack that is causing the issue. Follow the steps down below in order use Windows 10 Settings to re-download the additional language packages that you’re using:
Method 5: Reset Windows 10
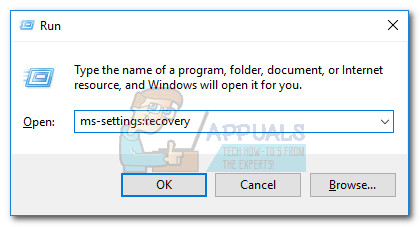
If all of the above methods have failed you, you have one last solution of fixing your broken IME, but it’s a bit drastic. Users have reported that performing a Windows 10 reset permanently dealt with the IME problem. On the downside, it wipes everything clean from your C: drive and removes any previously established user settings (except your personal files, if you choose so). If you decide to go through with it, you can minimize some of the damage by making a thorough backup of your most important files. You will have to spend some time putting everything together again, but it’s way better than being unable to change between your IMEs. To reset Windows 10, press Windows key + R to open a Run window and type “ms-settings:recovery“. Hit Enter to access the Recovery section of Windows 10 Settings. In the Recovery menu, click the Get started button, then choose Keep my files if you want to avoid losing your personal stuff. Next, follow the on-screen prompts to reset Windows 10 and fix your IME issues.
Windows 10 IME Bug Causes High CPU Usage & UnresponsivenessHow to Fix ‘Your Apple ID has been disabled’Fix: Audio Device is disabledFix: The CPU has been disabled by the guest operating system
![]()