Following this guide, you will be able to clean the nozzles and do basic troubleshooting which may help restore the black ink functionality. To begin the cleaning process follow the steps below:
Power on the printer.
Ensure that there are 5 or more A4 size papers in the tray.
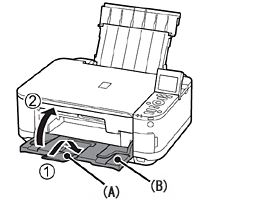
Open the paper output tray (B) and the output tray extension (A)
Start the cleaning process by selecting Setup on the printer’s panel. To select setup, press the tools/wrench icon.
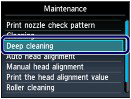
Using the arrow keys, locate and select the Maintenance Menu and press OK to enter into it.
Select “Deep Cleaning” and press the OK button.
Confirm your selecting by selecting YES and then press the OK button. This will begin cleaning, wait until the cleaning finishes before performing any other operations. It usually takes, 3 minutes.
After you see the pattern print confirmation on screen, press OK.
Fix: Dell Printer not Printing BlackHow to Reset Waste Ink Pad Counter for Epson L110, L210, L130, L300, L350, L355…Fix: HP Printer not printingHow to Fix Error Reference Source not Found when Printing from Office 2010,…